03 Oct 2022 •
5 min. read
These tips are meant for Ubuntu systems, but in general any Debian based distro should be ready to go.
Keep in mind that, as everything in life, nothing comes for free. Every optimization has its own pricetag and you must decide how much you are willing to pay for it.
Burning my disk, no more …
The Firefox sessionstore
Sessionstore is responsible for caching which pages were already opened should Firefox suddenly crash. While this is a great feature (you reopen all lost tabs and continue browsing), it causes a lot of writes to your SSD.
Disabling is really easy. Type about:config in de addressbar and press Enter. Click on agree and look for sessionstore. Double-click on browser.sessionstore.interval and change 15000 (15 seconds) to 15000000. Press OK, restart Firefox.
Swappiness (dismiss when having more than 16 Gb RAM)
When working with limited RAM, Ubuntu will aggressively try to free memory to enlarge the caches aka swapping. This again will lead to large quantities of write actions on your SSD which in their turn slow down your system and chip away at the disk’s total lifetime.
To change Ubuntu’s standard swap_tendency weight, open a terminal and query the current swappiness value by typing:
$ cat /proc/sys/vm/swappiness
Probably swappiness wil return a value of 60 which is too high for normal use. Let’s edit the configuration file:
$ gedit admin:///etc/sysctl.conf
The text editor app will open. At the end type:
# Lower swap_tendency
vm.swappiness=25
and save. To activate the new setting, restart the computer.
Move /tmp to tempfs
Another trick to make a machine run faster is moving /tmp to tmpfs. Temporary files will no longer be placed on the physical disk but in a virtual RAM disk.
Open a terminal and type:
$ sudo cp -v /usr/share/systemd/tmp.mount /etc/systemd/system/
$ sudo systemctl enable tmp.mount
Reboot the computer.
Should you experience issues, you can always undo the change by typing:
$ sudo rm -v /etc/systemd/system/tmp.mount
Activate the zram system kernel function
If your PC has enough memory, zram could be used to replace the /swap.img file altogether.
Enabling zram causes conflicts with zswap, which is activated by default. Disable it by typing the following command in your terminal:
$ echo 0 > /sys/module/zswap/parameters/enabled
Now we can load the zram module:
We should find a device node named /dev/zram0. Let’s allocate a size for it:
$ echo 1024M > /sys/block/zram0/disksize # change size to your liking.
Format that new device as if it was just a normal disk partition we designated for swap:
$ mkswap --label zram0 /dev/zram0
$ swapon -p 100 /dev/zram0
To set zram permanently, once again run gedit and add or change following lines in /etc/default/grub:
GRUB_CMDLINE_LINUX_DEFULT=""
GRUB_CMDLINE_LINUX="zswap.enabled=0"
Save the file and run:
to update the bootloader config files.
Now, we make sure the zram module is loaded at boot, and knows the number of devices we need (if we were also using zram for other tmpfs directories like /tmp, we’d have to increase the number):
$ echo "zram" > /etc/modules-load.d/zram.conf
$ echo "options zram num_devices=1" > /etc/modprobe.d/zram.conf
Create a udev rule so that the device node is formatted automatically as swap:
$ sudo -i
$ [sudo] password for **my username**:
$ root@yourmachinename:~# cat > /etc/udev/rules.d/99-zram.rules KERNEL=="zram0", ATTR{disksize}="1024M" RUN="/usr/sbin/mkswap -L zram0 /dev/zram0", TAG+="systemd"
Add the device to /etc/fstab. Additionally, we can give the pri=value as an option to the swap entry:
$ sudo -i
$ [sudo] password for **my username**:
$ root@yourmachinename:~# printf "/dev/zram0\tnone\tswap\tdefaults,pri=100\t0\t0\n" >> /etc/fstab
$ root@yourmachinename:~# tail /etc/fstab # to check the output.
Reboot and verify that the swap device is active:
$ history | tail -n 2
$ swapon
Lower the pressure on the inode cache
If your PC has has enough free RAM available, you can also achieve a little more performance by lowering the tendency on reclaiming the memory which is used for caching of directory and inode objects.
Warning, clearing cache less frequently can impact new processes trying to load (bad_address or address_in_use).
Open your terminal and type:
$ gedit admin:///etc/sysctl.conf
Our text editor opens. Add following lines to the config file:
# Customize cache management
vm.vfs_cache_pressure=50
and save. This setting will be activated after rebooting your computer.
These are just some tips I think are useful. Should something be missing or you have an item that belongs in this list, please let me know by mail.
Ref: Web: zram: Compressed RAM based block devices - Kernel.org.
24 Aug 2022 •
2 min. read
Warning for non-experienced users
General recommendation from Canonical is making a backup and re-install your system should you run a non-secure EOL release. Their advice is sound and often proves to be the safest way. So, if you still decide to give my post a try, don’t dare yelling at me when your system goes bonkers. I told you so.
List of commands
$ sudo apt-get update
[sudo] password for lgeurts:
# You should see output similar to this.
E: The repository 'http://old-releases.ubuntu.com/ubuntu groovy Release' does not have a Release file.
N: Updating from such a repository can't be done securely, and is therefore disabled by default.
N: See apt-secure(8) manpage for repository creation and user configuration details.
E: The repository 'http://old-releases.ubuntu.com/ubuntu groovy-updates Release' does not have a Release file.
N: Updating from such a repository can't be done securely, and is therefore disabled by default.
N: See apt-secure(8) manpage for repository creation and user configuration details.
E: The repository 'http://old-releases.ubuntu.com/ubuntu groovy-security Release' does not have a Release file.
N: Updating from such a repository can't be done securely, and is therefore disabled by default.
N: See apt-secure(8) manpage for repository creation and user configuration details.

# Next test, spewing more jibberish.
$ sudo do-release-upgrade
Please install all available updates for your release before upgrading.

# Clean the apt cache.
$ sudo rm -rf /var/lib/apt/lists/*

# Remove old kernels and all automatically installed dependencies that are no longer needed by any package.
$ sudo apt --purge autoremove

# Replace entries in sources files.
$ sudo sed -i "s/old-releases/archive/g" /etc/apt/sources.list /etc/apt/sources.list.d/*.list

# These 3 echo commands are for making sure you really have the correct entries even the above should have done the trick.
# Can also use any editor you want if that makes you feel more comfy.
$ echo "[deb http://old-releases.ubuntu.com/ubuntu/ groovy main restricted universe multiverse]" | sudo tee -a /etc/apt/sources.list
$ echo "[deb http://old-releases.ubuntu.com/ubuntu/ groovy-updates main restricted universe multiverse]" | sudo tee -a /etc/apt/sources.list
$ echo "[deb http://old-releases.ubuntu.com/ubuntu/ groovy-security main restricted universe multiverse]" | sudo tee -a /etc/apt/sources.list

# Kick it.
$ sudo apt-get update
$ sudo apt-get upgrade
$ sudo apt-get dist-upgrade # do-release does this again.
$ sudo apt install update-manager-core
$ sudo do-release-upgrade
When finished, clean up (sudo apt autoclean | sudo apt autoremove), check those non apt installed apps, and renew your custom PPAs.
29 Mar 2022 •
3 min. read
Back in the days, a company had to buy expensive physical servers, set those up somewhere in rooms that were outfitted with peripheral subsystems for cooling, ventilation, fire suppression, etc., and then configure each server in order to run their applications. They also had to hire engineers to maintain these bare-metal servers and troubleshoot any issues that could occur along the way.
This entire process of deploying servers, or any other devices, could take days to complete, and required properly allocating capacity since you can’t dynamically add and remove CPUs, RAM, disks, etc. For those living on the bleeding edge the server-based model often proved to be quite inconvenient, very labor-intensive, and entailing high costs (CAPEX vs OPEX).
Starting 2016, cloud computing ushered the era of on-demand virtual machines that you can use to launch online solutions in a matter of minutes instead days or weeks. A bare-metal server runs the host OS and a virtualization layer which produces tens or hundreds of virtual machines. This pool of virtual machines is sharing the CPU cores, RAM, network bandwidth, and disks that are attached to the host computer.
Since a VM has its own OS, it also has its own kernel which provides for a secure boundary over other VMs running in our host computer. It takes time to launch all of these instances due to the different components that the hypervisor must virtualize and allocate. Moreover, you will have to pay the costs of running your VMs, including idling time when a resource isn’t used at all. And let’s not forget that virtual machines are running a guest operating system that needs updates.
Next step was a smaller virtualized entity called container (Docker, Kubernetes pods). Containers share the physical server’s OS system kernel but do not run a guest OS with its own kernel, unlike a VM. They are primarily used to virtualize and run application libraries and dependencies.
Although a container provides a significantly reduced startup time over a VM, it still has operating costs that you have to cover. The burden of paying active and idle time remains, even if no one is using your containerized application at all.
This is where serverless kicks in. Serverless is in essence a combo of a VM and a container, but in contrast to containerization, serverless uses a small optimized kernel virtualized on top of a kernel-based virtual machine (MicroVM).
Serverless let’s you run code, manage data, even integrate business applications without managing any servers because the CSP will handle these tasks for you.
Speaking about fees, in contrast with VMs and/or containers, serverless services don’t run continuously. A serverless setup will only start when it is invoked, and will afterwards release all computing capacity. This is the reason why serverless architectures are the most cost-effective since you don’t pay for idle time.
09 Nov 2021 •
4 min. read
A few years ago something totally unexpected happened. It was at the end of the day and I was fully prepared to move behind my laptop at the home office. Instead I decided to do something else, not waste my evening on what became a daily routine; tweeting, liking posts on my LinkedIn, uploading fresh pictures on Instagram, answering Slack messages, scouring internet for anything interesting to read and learn.
Being away from my computer felt like something special. I started living regular life, spending my free time as any other guy would do, watching movies together with J. (girlfriend), playing with our dogs on the beach, going out with friends.
I could have spent time behind this blog as well, but I chose not to. I was able to get a clear head, think about how I used my computer, and phone, how I perhaps consumed and processed more information than I really wanted to, and what the long term effects of that do to a person.
In periods I can burn a lot of time tinkering with all kinds of hardware, Linux and open source software!! I’m that introvert perfectionist with a slight touch of OCD who gets a bit too obsessed about particular things and who can’t let anything go before he’s really done with it > In the past this behavior actually led to a few years of unhealthy multiplayer gaming (CS:GO), so it’s not something I take lightly.
In the back of my head I already knew I had to take counter-measures to prevent falling back in the same trap, and letting my mind go on the loose again.
So, first task, I started with disposing old hard-disks, floppy’s, zipdrives, network cables, a Pentium Pro desktop, even an old SPARCstation. All that awesome stuff you usually gather when working years in IT. Sometimes it was a painful activity because you feel bonded with objects that link to good memories from the past.
Anyways, this was a big step in de-cluttering my life and it has made some huge positive improvements on my productivity and what I call my hyper-focus.
I also realized that while my workflow had improved, I did things the younger me would never ever have approved.
As an example, one of those things was leaving an application open and letting it run in the background, even when I was not there. I know this sounds rather silly but closing an application when I don’t use it does help focus on what I’m doing. For that reason, I replaced the OS on two of my Lenovo workstations with vanilla Debian & I3 WM. (See guys? Told you this post was not exclusively about scoring points on LinuxPorn!)
The third step. I became picky about what channels to subscribe to, and made an agreement that at a certain time in the evening I’d stop, no matter how much my desire to keep hanging on (if I don’t I have to take her out to a fancy diner). After some time I found the everlasting craving for more was gone, and I truly enjoyed the nothingness, loved all that time I now had on my hands more than anything.
I eventually launched Newsboat, and closed it after a quick glance. Then fired up Vim and removed about 80% of the feeds. Most were other we(b)logs, a variety of tech and/or open source related projects and some news sites. The first was CNN International that posts —multiple times per day— about everything from movie trailers, science and tech, to politics. While this was pretty good at giving me the latest highlights it took more time than what it was worth to keep up with.
We both don’t like TV channels because of the irritating commercials filled with products we are never going to buy. Thus Netflix was the only agreeable option.
Last week I took the last step and told my customer(s) I would take 5 days off for studies, no matter what outcome. Yes, every unproductive day is money lost, but at the end those certifications are a long-term investment that will pay for itself.
Update d.d. 15/11/21: Bought a Garmin Fenix 6 Smartwatch and Aeku M5 phone after reading this blog post. Let’s see if they can replace my BlackBerry Android.
Something to think about. Since we have a limited quota of time in this world, why not rather spend that on things and people we find fun, that bring joy in our life and that keep us productive?
So. I hope you will understand and don’t feel offended if I can’t follow on social media; it’s nothing personal. It’s for the good of me, and hopefully you.
02 Nov 2021 •
5 min. read
Today we are going to talk a bit about this open source tool called Activity Aware IDS for AWS which helps system admins be more aware of activities in their AWS account, including those that might include potential account compromises. Our post will focus on some more common use cases for Activity Aware IDS, and how to start using it today. But before we get to that, it’s important to understand the 3 security threats you face as an AWS customer, your responsibility in protecting against them, and refresh what you learned about the least privilege principle as best practice in thinking about security and access control.
The principle of least privilege
Any systems, any identities (users, programs, systems, etc.) granted privileges to access resources or information, should be granted only the minimum privileges necessary to perform their tasks. In the Activity Aware IDS default configuration, it will inform you or your team when users or roles are attempting to use actions or access resources beyond their privileges.
You can also configure Activity Aware IDS to notify you of AWS API actions, even when these actions are permitted, but this turns out to be more complex and was something we simply did not have the time for (so that task is up to you).
The AWS Shared Responsibility Model
A cornerstone of security in the AWS Cloud is the Shared Responsibility Model. At its highest level, this is a delineation between what AWS takes responsibility for to secure, and what you as an AWS customer are responsible for securing.
AWS takes care of security OF the cloud, YOU take care for security IN the cloud.
From the AWS side, they take responsibility for securing the building blocks used to compose your systems. These typically include Compute (EC2) hosts, Storage (S3) infrastructure, Databases (RDS), Networking infrastructure, and so on. That’s not to say you should throw all of your customers’ credit card data into an S3 bucket and think your security responsibility is according AWS agreement.
You still have to lock that bucket!
Security Threats in the Cloud
The 3 major types of security incidents in AWS:
- Infrastructure Impact,
- Host Compromise,
- Account Compromise.
Infrastructure Impact includes external attacks on the underlying infrastructure of your application. This type of attacks largely consists of Distributed Denial of Service (DDoS) attacks, where an attacker sends a large volume of traffic at your site. AWS Shield is a service you can use to prevent that kind of attacks.
Host Compromise involves techniques like command injection to gain access to your resources, such as those EC2 instances. A free source for BitCoin mining or gaining access to their data & approach other instances that likely hold valuable data. Host-based intrusion detection and intrusion prevention are the two most common methods of alleviating this type of threat.
Account Compromise involves an attacker gaining access to users or roles on an instance, and then using them for the data they have access to, or the resources they can create.
There are not many solutions that fill the gap. Activity Aware IDS for AWS does.
When the attacker attempts to scout for permissions of compromised identities (users, roles), he/she will definitely get access denied to a number of the actions and resources they attempt to use while testing. Activity Aware IDS notifies you of these denials in for example a Slack channel.
Use Cases
Activity Aware IDS uses CloudTrial and the least privilege principle.
Lets imagine a user named Mr. X had his credentials compromised by a attacker Mr. Z.
Mr. Z wants to see what groups and roles they have access to through Mr. X’s account. Mr. Z doesn’t have access rights to view groups Mr. X is associated with, and doesn’t have access to view policies attached to those groups.
If Mr. Z tries to view the policies, the system raises a access denied which gets logged to CloudTrail.
At this point Activity Aware IDS receives a denial log, converts it into a friendly format, and then sends it to your Slack Channel. Once the message arrives, you will see that there are strange “Access Denied” messages associated with Mr. X.
Good administrators will call the user causing that message and find he wasn’t performing the actions. Time to replace his credentials.
Mr. Z was blocked from performing actions due to the least privilege principle. Although this is a standard recommendation in security land, it can be difficult in finding the exact set of permissions that a user or role should have. Activity Aware IDS for AWS can also assist with this.
You are deploying a new service, and you want to give it permissions following the least privilege. The easy way to start is creating a role with no permissions. Let’s assume your system needs to send logs to CloudWatch Logs (requirement for AWS Lambda). When the system attempts to create a new Log Group, it will get denied, because the role has not gained permissions. An event logs all data into CloudTrail where Activity Aware IDS will pick it up and send a message to Slack, where you can review the action being attempted, the role involved with the action, and the arn of the specific resource it’s trying to perform the action on.
At this point you could add a statement to the policy for the role thus allowing access to “CreateLogGroup” and give a fairly restrictive resource description.
What to do next
Feel like getting your hands dirty? Check the Giftbit Guide.
Ref: Web: Some content was copied from the Giftbit repo.
15 Oct 2021 •
9 min. read

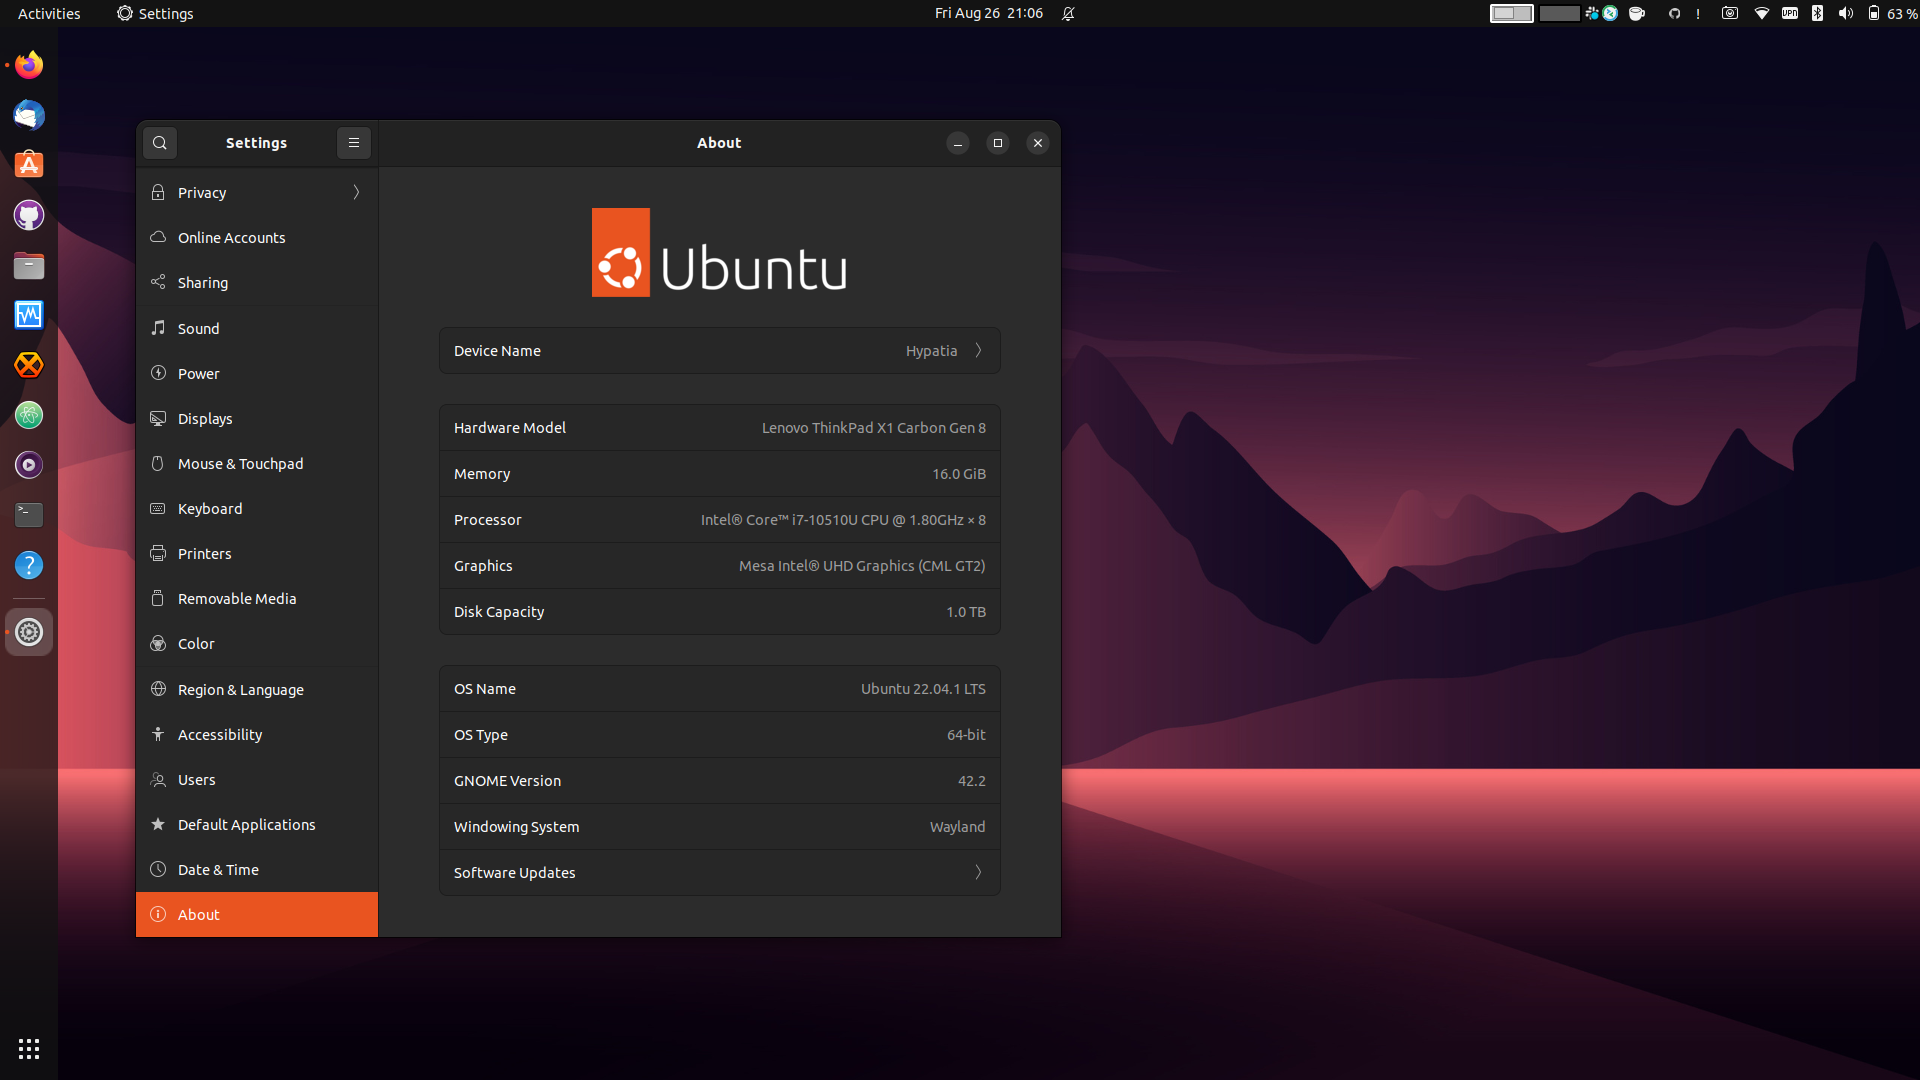
BIOS functions
Firmware updates
Lenovo sends out capsules which when running Ubuntu Update-Manager will be available for installation. Ref: Lenovo Knowledge Base.
Sleep states
The BIOS has 2 Sleep State options, which you can find in Config > Power > Sleep State.
The Linux option is a traditional S3 power state where all hardware components are turned off except for the RAM, and it should work normally.
The Windows option is a newer software-based “modern standby” which works on Linux (despite the name). One benefit to the Windows sleep state is a faster wake up time, a possible drawback is increased power usage.
Tested the Windows option > did not notice any major loss on battery time.
Software packages
My bash & zsh history output
$ sudo apt install ubuntu-restricted-extras
$ sudo apt install rkhunter
 <> sudo rkhunter -c --noappend-log
$ sudo apt install clamav clamav-daemon
 <> $ sudo systemctl stop clamav-freshclam
 <> $ sudo freshclam
 <> $ sudo systemctl start clamav-freshclam
 <> $ sudo clamscan --recursive .
$ sudo apt install clamtk
$ sudo apt install clamtk-gnome
$ sudo apt install tmux
$ sudo apt install xclip
$ sudo apt install xdotool
$ sudo apt install devilspie
$ sudo apt install neofetch
$ sudo apt install curl
$ sudo apt install youtube-dl
$ sudo apt install hexchat
$ sudo apt install gimp
$ sudo apt install vim
$ sudo apt install python
$ sudo apt install git
$ sudo apt install htop
$ sudo apt install iotop
$ sudo apt install iftop
$ sudo apt install ttyload
$ sudo apt install ranger
$ sudo apt install trash-cli
$ sudo apt install shellcheck
$ sudo apt install whois
$ sudo apt install fzf
$ sudo apt install postfix
$ sudo apt install pcscd #needed for Yubico Authenticator
 <> sudo systemctl status pcscd.socket
 <> sudo service pcscd start
 <> sudo systemctl enable pcscd
$ sudo apt install unrar zip unzip p7zip-full p7zip-rar rar
$ sudo apt install virtualbox virtualbox-ext-pack -y
 <> $ sudo sh sign-vboxmodules.sh
$ sudo usermod -a -G vboxusers $USER
$ sudo apt install wireshark
 <> $ sudo adduser **my username** wireshark
$ sudo apt install metadata-cleaner
$ sudo apt install steam
$ sudo apt install dino-im
$ sudo apt install dconf-editor
$ sudo apt install gparted
$ sudo add-apt-repository ppa:yann1ck/onedrive
 <> $ sudo apt update
 <> $ sudo apt install onedrive
 <> $ onedrive --synchronize --verbose --dry-run
 <> $ systemctl --user enable onedrive
 <> $ systemctl --user start onedrive
 <> $ systemctl status --user onedrive
$ sudo add-apt-repository -y ppa:teejee2008/ppa
 <> $ sudo apt update
 <> $ sudo apt install timeshift
$ curl -fLo ~/.vim/autoload/plug.vim --create-dirs https://raw.githubusercontent.com/junegunn/vim-plug/master/plug.vim
 <> $ touch .vimrc
$ git clone https://github.com/powerline/fonts.git --depth=1
 <> $ cd fonts
 <> $ ./install.sh
 <> $ cd..
 <> $ rm -rf fonts
$ sudo apt update && sudo apt install ecryptfs-utils cryptsetup
$ curl "https://awscli.amazonaws.com/awscli-exe-linux-x86_64.zip" -o "awscliv2.zip"
 <> $ unzip awscliv2.zip
 <> $ sudo ./aws/install -i /usr/local/aws-cli -b /usr/local/bin
 <> $ aws configure --profile **my username**
$ sudo apt install zsh
 <> $ zsh --version
 <> $ echo $SHELL
 <> $ chsh -s $(which zsh)
$ git clone https://github.com/zsh-users/zsh-autosuggestions.git $ZSH_CUSTOM/plugins/zsh-autosuggestions
$ git clone https://github.com/zsh-users/zsh-syntax-highlighting.git $ZSH_CUSTOM/plugins/zsh-syntax-highlighting
$ sh -c "$(curl -fsSL https://raw.github.com/ohmyzsh/ohmyzsh/master/tools/install.sh)"
$ git clone https://gitlab.gnome.org/GNOME/sushi.git
 <> $ cd sushi-3.38.0 (could be a newer version)
 <> $ sudo apt install meson libevince-dev gir1.2-gstreamer-1.0 librust-gstreamer-audio-sys-dev librust-gstreamer-audio-sys-dev libgtksourceview-4-dev libmusicbrainz5-dev libwebkit2gtk-4.0-dev libgirepository1.0-dev ninja-build
 <> $ meson builddir && cd builddir
 <> $ sudo meson install
$ sudo apt install gufw
$ sudo apt install mupdf
$ sudo apt install dnsutils
$ sudo apt -y install net-tools
$ sudo apt install smartmontools
$ sudo apt remove --purge -y totem
$ sudo apt remove --purge -y rhythmbox
$ sudo apt remove --purge -y transmission transmission-common transmission-gtk transmission-qt
$ sudo apt update && sudo apt upgrade
$ sudo apt install mpv
$ sudo apt install ffmpeg
$ sudo apt install ffmpegthumbnailer
$ sudo apt install protonvpn
$ sudo apt install gnome-tweak-tool
$ sudo apt install gnome-shell-extensions
$ sudo apt install gnome-shell-extension-appindicator gir1.2-appindicator3-0.1
$ sudo apt install gnome-shell-pomodoro #/bin/gnome-pomodoro --no-default-window
$ sudo add-apt-repository -y ppa:libreoffice/ppa
 <> $ sudo apt update && sudo apt install libreoffice
$ sudo apt install -y fonts-cascadia-code fonts-firacode
$ sudo apt install ttf-mscorefonts-installer
$ sudo snap install canonical-livepatch
$ sudo snap install kubectl
$ sudo snap install powershell --classic
$ sudo snap install slack --classic
$ sudo wget https://github.com/shiftkey/desktop/releases/download/release-2.6.3-linux1/GitHubDesktop-linux-2.6.3-linux1.deb
 <> $ sudo apt install gdebi-core
 <> $ sudo gdebi GitHubDesktop-linux-2.6.3-linux1.deb
$ sudo curl -O https://releases.hashicorp.com/vagrant/2.2.9/vagrant_2.2.9_x86_64.deb
 <> $ sudo apt install ./vagrant_2.2.9_x86_64.deb
$ sudo apt install flatpak gnome-software-plugin-flatpak gnome-software
$ flatpak remote-add --if-not-exists flathub https://flathub.org/repo/flathub.flatpakrepo
$ sudo flatpak install flathub io.atom.Atom
$ sudo flatpak install flathub app.drey.Dialect
$ sudo flatpak install flathub ch.protonmail.protonmail-bridge
$ sudo flatpak install flathub ch.protonmail.protonmail-import-export-app
$ sudo flatpak install flathub com.github.IsmaelMartinez.teams_for_linux
$ sudo flatpak install flathub com.github.tchx84.Flatseal
$ sudo flatpak install flathub com.spotify.Client
$ sudo flatpak install flathub com.yubico.yubioath
$ sudo flatpak install flathub de.haeckerfelix.Fragments
$ sudo flatpak install --user flathub io.podman_desktop.PodmanDesktop
$ sudo flatpak install flathub org.gnome.gitlab.YaLTeR.VideoTrimmer
$ apm install pigments
$ apm install file-icons
$ apm install teletype
$ apm install atom-beautify
$ apm install todo-show
$ apm install expose
$ apm install emmet
$ apm install color-picker
$ apm install markdown-writer
$ apm install language-markdown
$ apm install language-powershell
$ apm install autocomplete-python
$ apm install language-batchfile
$ apm install language-vbscript
$ apm install language-reg
$ apm install minimap
$ apm install minimap-autohider
$ apm install autoclose-html-plus
$ apm install text-align
$ cd Documents
 <> $ find . -type f -print0 | xargs -0 chmod -x
$ gsettings set org.gnome.desktop.privacy remember-recent-files false
$ gsettings set org.gnome.shell.extensions.dash-to-dock click-action 'minimize'
$ gsettings set org.gnome.settings-daemon.plugins.media-keys max-screencast-length 0
$ sudo nano /usr/share/applications/vim.desktop #remove gvim icon > NoDisplay=true
$ sudo nano /usr/share/applications/info.desktop #remove texinfo icon > NoDisplay=true
Resources:
Note: dotfiles are available in this private repo.
Browser extensions
Add DuckDuckGo, Privacy Badger, HTTPS Everywhere, and Facebook Container. Do not use other sources!
System specifics
Hibernation modus aka deep sleep
Simply closing the lid will probably trigger deep sleep. Probe using the command line:
If not, upgrade to a newer kernel.
Low cTDP and trip temperature in Linux
This problem is related to ‘thermal throttling’ on Linux, which is set much below Windows values. It will cause your laptop to run slower than it could when under heavy stress.
Before attempting to apply this solution, make sure that the problem still exists. To do so, open a Linux terminal and run following commands:
$ sudo apt install msr-tools
$ sudo rdmsr -f 29:24 -d 0x1a2
If you see 3 as a result value (15 when running on the battery), you don’t have to do anything. Otherwise:
Warning - The next steps can cause serious issues on your system. See this page for more details.
- Disable Secure Boot in the BIOS (won’t work otherwise).
- Install the throttled fix:
$ sudo apt install git build-essential python3-dev libdbus-glib-1-dev libgirepository1.0-dev libcairo2-dev python3-cairo-dev python3-venv python3-wheel
$ git clone https://github.com/erpalma/throttled.git
 <> $ sudo ./throttled/install.sh
- Make sure that thermald is not setting it back down:
$ sudo systemctl stop thermald.service
$ sudo systemctl disable thermald.service
- If you want thermald permanently disabled, even after a package update:
$ sudo systemctl mask thermald.service
- Verify that throttled is running:
$ sudo systemctl status throttled
- Check again that the result from running the rdmsr command is 3.
Battery temperature levels
I use lower temperature levels to preserve battery life at the cost of performance. To change default values, edit your /etc/throttled.conf file, and set Trip_Temp_C for both battery and AC the way you want:
[BATTERY]
# Other options here...
PL2_Tdp_W: 40
Trip_Temp_C: 75

[AC]
# Other options here...
PL1_Tdp_W: 34
PL2_Tdp_W: 40
Trip_Temp_C: 90
Battery charging thresholds
There are a lot of theories and advisories about ThinkPad charging thresholds.
Some say thresholds are needed to keep the battery healthy, some think they are useless and the battery will work the same just as it is.
I always stick with the following settings for my laptops (because they are mostly on AC):
Start threshold: 60% - Stop threshold: 65%
This means that charging will start only if the battery level goes down below 60% and will stop at 65%. This prevents my battery from being charged too often, and from being charged beyond a recommended level.
To achieve this for Linux based machines:
- Install this list of packages:
$ sudo apt install tlp tlp-rdw acpi-call-dkms tp-smapi-dkms acpi-call-dkms
- Start the tlp service:
$ sudo systemctl enable --now tlp.service
- After that edit the /etc/tlp file and change below values:
# Uncomment both of them if commented out
START_CHARGE_THRESH_BAT0=60
STOP_CHARGE_THRESH_BAT0=65
- Reboot, run:
$ sudo tlp-stat --battery
- Verify that the values are as you expected:
tpacpi-bat.BAT0.startThreshold          = 60 [%]
tpacpi-bat.BAT0.stopThreshold           = 65 [%]
- You can change these thresholds anytime, and apply changes typing:
Note: if you need your laptop fully charged, you can achieve that by running the following command while connected to AC:
29/01/23: This post will be updated every time I commit changes to my system. One of these will be the future replacement of Atom with Pulsar Edit.